How to carve snowboarding: Tips, Steps and more
Snowboarding is a fun and exciting winter sport that attracts many enthusiasts all over the world. Carving, a technique used in snowboarding, is a way of making turns down the mountain by engaging your edges in the snow. It requires proper technique and practice to master. In this article, we will explore the tips and steps for carving to help you become a better snowboarder.
So let's get started.
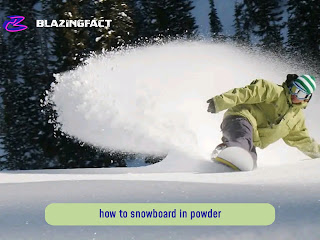
 |
| Carve snowboarding |
Tips To Carve On A Snowboarding
Carving can be challenging for beginners, but with some tips and practice, you can quickly improve your technique and have a blast on the mountain. here are some tips to help you improve your snowboarding carving technique:
Tip 1: Practice on Mellow Terrain
When starting, it's crucial to practice on mellow terrain. It means finding a slope with a gradual incline, without any steep sections. This will give you enough space to make the turns without feeling intimidated, and help you build confidence and technique gradually. Mellow terrain is also great for mastering the basics of carving, such as weight distribution and edge control.
Tip 2: Keep Your Weight Centered
To carve effectively, you need to keep your weight centered and avoid leaning too far back or forward. A centered stance will help you control your speed and maintain balance. When you're on your snowboard, your knees should be bent, and your hips should be over your board. Try to keep your upper body stable and avoid twisting or turning too much.
Tip 3: Stack Your Edges
Stacking your edges means pressing both your toes or heels down to engage both edges of the snowboard. This will help you control the turn and provide grip. To stack your edges, start by bending your knees and leaning slightly forward. Then, press down on your toes or heels, depending on the direction you want to turn. This will engage both edges of the snowboard and allow you to make smoother, more controlled turns.
Tip 4: Look Ahead
To make smooth turns, you need to anticipate the turn before it happens. Look ahead and plan your approach. This will give you enough time to adjust your stance and make the turn smoothly. Keep your eyes focused on where you want to go, not on your feet or the snow beneath you. This will help you stay balanced and centered while making turns.
Tip 5: Engage Your Edge
Engage your edge and control the downhill edge with your body position. As you start to turn, lean your body in the direction you want to go. Keep your weight centered over the snowboard and control the downhill edge with your body position. You may need to adjust your weight distribution and body position as you make sharper turns. Practice making turns on mellow terrain and gradually increase your speed as you improve your technique.
Tip 6: Use Your Shoulders
Your shoulders play an important role in carving. As you turn, use your shoulders to initiate the turn and guide your body in the direction you want to go. Rotate your shoulders in the direction of the turn and keep your hips facing forward. This will help you maintain your balance and control as you carve.
Tip 7: Practice Switch Carving
Once you've mastered regular carving, it's time to try switch carving. This involves making turns in the opposite direction of your regular stance. It may feel awkward at first, but practicing switch carving will help you improve your overall snowboarding technique and make you a more versatile rider. Start by practicing on mellow terrain and gradually increase your speed as you get more comfortable.
Tip 8: Stay Relaxed
Tension and stiffness in your body can affect your carving technique. Try to stay relaxed as you make turns and flow with the movements of the snowboard. This will help you maintain your balance and control and make your carving more fluid and efficient. Take deep breaths and focus on staying loose and flexible.
Tip 9: Gradually Increase Your Speed
Once you've mastered the basics of carving, it's important to challenge yourself and gradually increase your speed. This will help you build confidence and improve your control and technique. Start by practicing on mellow terrain and gradually increase your speed as you get more comfortable. Remember to always stay in control and be aware of your surroundings.
By following these tips and practicing regularly, you'll be able to carve like a pro in no time. Don't forget to have fun and enjoy the ride!
Let's move on to the steps to carve on snowboard
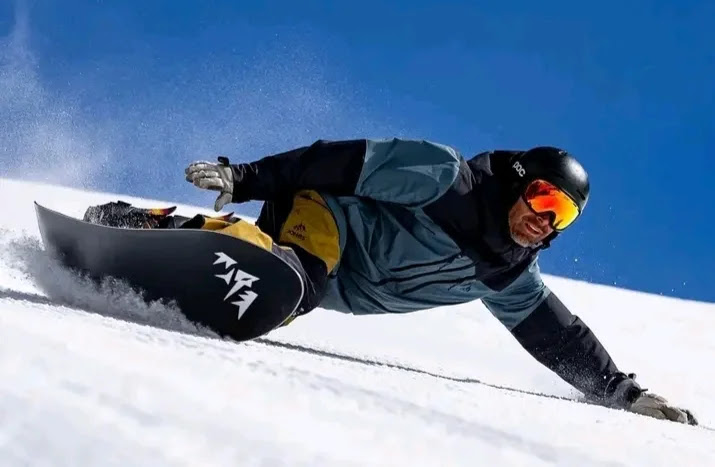
 |
| How to carve on a snowboard |
Step to Carve on snowboard
Step 1: Edge Stacking
When it comes to carving, it all starts with the position of your body. You need to "stack" your edges, which means placing your weight on your front foot while leaning slightly forward. This position is critical because it allows you to initiate the turn more easily.
Personally, I like to imagine that I'm reaching out to grab something in front of me while keeping my shoulders squared down the mountain. This helps me maintain my balance and keep my weight centered.
If you're struggling with edge stacking, start by practicing on flat terrain. Focus on shifting your weight forward and keeping your back foot behind you for balance. As you get more comfortable with the position, you can start practicing on mellow runs.
Step 2: Engage Edge
Once you've stacked your edges, it's time to engage them in the snow. To do this, you need to roll your ankle towards the edge of the snowboard.
Personally, I find it helpful to focus on my front foot and apply pressure to the ball of my foot while lifting my heel slightly. This allows me to engage the edge and initiate the turn.
It's important to note that the edge you choose to engage depends on the direction of the turn you want to make. For example, if you want to turn left, you'll need to engage your left edge.
If you're struggling with engaging your edge, try practicing on flat terrain first. Focus on shifting your weight forward and rolling your ankle towards the edge. Once you feel comfortable with this, you can start practicing on mellow runs to perfect your technique.
Step 3: Edge Roles
As you start to turn, your snowboard's edges play different roles. The edge that is engaged in the snow is the "downhill edge," and the edge that is lifted is the "uphill edge." The downhill edge helps you control the turn and provides grip, while the uphill edge helps to initiate the turn.
Personally, I like to think of the downhill edge as the "brake pedal" and the uphill edge as the "gas pedal." When you want to slow down or control your speed, you press down on the downhill edge. And when you want to initiate a turn or pick up speed, you engage the uphill edge.
It's essential to remember that your body position and weight distribution play a crucial role in edge roles. To control your speed and maintain balance, you need to keep your weight centered and avoid leaning too far back or forward.
Step 4: Mellow Run
When you first start carving, it's best to practice on a mellow run. This will give you enough space to make the turns without feeling too intimidated. Focus on your technique and maintaining your balance. You should also keep your body relaxed and avoid being too tense.
Personally, I remember feeling nervous when I first started carving on steeper runs. But by practicing on mellow terrain first, I was able to build my confidence and technique gradually.
When you're on a mellow run, focus on stacking your edges, engaging your edge, and maintaining a centered position. Try making wide, sweeping turns to get a feel for the technique. As you become more comfortable, you can start to increase your speed and make sharper turns.
Remember, practice makes perfect. Don't get discouraged if it takes a few tries to master the technique. Keep at it, and you'll be carving like a pro in no time!
Step 5: Steeper Run
Once you've mastered carving on mellow terrain, it's time to step it up a notch and try carving on steeper runs. This is where your technique and confidence will be put to the test.
When you're carving on a steeper run, it's important to maintain a centered position and keep your weight stacked on your front foot. This will help you control your speed and maintain balance.
As you initiate the turn, remember to engage your edge and control the downhill edge with your body position. You may need to adjust your weight distribution and body position as you make sharper turns.
Personally, I find it helpful to look ahead and anticipate the turn before it happens. This helps me plan my approach and make smoother turns.
It's essential to note that carving on steeper runs requires more skill and technique than on mellow terrain. Take it slow and practice on progressively steeper terrain as you build your confidence and technique.
Personal Experience
As an avid snowboarder, I can attest to the thrill and excitement of carving down the mountain. When I first started carving, I struggled with my technique and often found myself losing balance. However, with practice and determination, I was able to master the technique and carve with ease.
One tip that helped me improve my carving technique was to focus on my body position. By keeping my weight centered and my shoulders facing downhill, I was able to maintain balance and control during turns. I also found that practicing on different terrain types, such as powder or groomers, helped me become a more well-rounded snowboarder.
Where to Practice Carving
When it comes to practicing carving, choosing the right location is crucial. Groomed runs are the ideal place to start as they provide a smooth and consistent surface for you to practice on. Look for runs that are wide and free of obstacles like trees, rocks, and bumps. This will give you plenty of space to work on your technique without worrying about hazards.
It's also important to consider the slope angle when selecting a place to practice carving. A gentle slope is a good place to start, as it will allow you to focus on your technique without worrying too much about speed. Gradually increase the slope angle as you become more confident in your abilities. However, it's important to always stay within your skill level and avoid attempting runs that are beyond your ability.
Taking a lesson with a qualified instructor can be an incredibly valuable way to improve your carving technique. They can provide you with feedback on your technique, identify areas where you need to improve, and offer tips and drills to help you progress. They can also recommend the best runs for practicing carving and help you build confidence on the slopes.
As you become more comfortable with carving on groomed runs, you can start to progress to more challenging terrain. Steeper runs and ungroomed terrain provide a greater challenge, but also require more advanced skills and techniques. Make sure you are always aware of your surroundings and stay within your ability level.
Final Thought
Carving is an exhilarating experience that can quickly become addictive once you get the hang of it. It's like defying gravity and feeling the wind rushing past you as you carve from one edge to the other. Once you've mastered the technique, it can open up a whole new world of snowboarding for you, including jumps, jibs, and rotations.
So, don't hesitate to strap on your board, hit the slopes, and start practicing your carves. With dedication and practice, you'll soon be carving like a pro and enjoying all the thrills that snowboarding has to offer. Just remember to stay safe, wear your helmet, and have fun!
Frequently Asked Questions
What is carving in snowboarding?
Carving in snowboarding is a technique where the rider leans into their turn, using the edges of the board to create a clean, curved line in the snow. This allows the rider to control their speed and direction while maintaining a fluid motion down the slope.
How do I start learning to carve?
The best way to start learning to carve is by practicing on groomed runs with a gentle slope. Begin by mastering the fundamentals, such as edge control and body positioning, before gradually progressing to steeper terrain.
How important is body positioning when carving?
Body positioning is critical when carving. The rider's weight should be evenly distributed over both feet, with the knees bent and the upper body leaning slightly downhill. This allows the rider to maintain balance and control while carving.
How do I know if I'm carving correctly?
Proper carving technique results in a smooth, flowing motion down the slope with clean, curved lines in the snow. If you find yourself skidding or sliding on your turns, or if your lines are jagged or erratic, you may need to adjust your technique.
How can I improve my carving technique?
Practice is the key to improving your carving technique. Focus on maintaining proper body positioning and edge control, and gradually increase your speed and turn radius as you become more confident. Taking a lesson with a qualified instructor can also be a great way to receive feedback and improve your technique.
Do I need special gear for carving?
While specialized gear isn't necessary for carving, having the right equipment can make a significant difference. A snowboard with a narrow waist and a medium to stiff flex is ideal for carving, as it provides the necessary stability and edge control. Additionally, a good pair of boots and bindings that provide a comfortable and responsive fit can also improve your carving performance.
Can carving be done on any terrain?
While carving can be done on most terrain, it's important to choose the right terrain for your skill level. Beginners should stick to groomed runs with a gentle slope, while more advanced riders can progress to steeper and more challenging terrain. Always be aware of your surroundings and never attempt runs that are beyond your ability level.
Can I carve on a snowboard that's too long or too short for me?
It's not recommended to carve on a snowboard that's too long or too short for you, as it can affect your ability to control the board and execute proper carving technique. It's important to choose a snowboard that's the right size for your height and weight, as well as your skill level and riding style.
Is carving only for advanced snowboarders?
While carving is often associated with advanced snowboarding, it's a technique that can be learned and practiced by riders of all skill levels. Beginners can start by mastering the fundamentals and gradually progressing to more advanced techniques as they become more confident on their board. Taking lessons with a qualified instructor can be a great way to learn carving technique and progress your skills safely and effectively.